For some context, Sarah and Dylan were my housemates for 2 of the 3 years I lived in Vancouver, and I knew that I wanted to do something special for friends that meant so much to me. I also knew that it would take a lot of planning to ensure that everything went smoothly, given that their wedding was happening a 4 hour drive away from my kitchen, I was also going to be a bridesmaid, and I wanted to enjoy the wedding instead of being a frantic, frazzled, mess. I decided to do an entire dessert table, with a cake, cupcakes, cookies, truffles, and a candy buffet. To manage everything, I had a spreadsheet keeping track of all of my various to-do tasks for each element of the dessert table. That spreadsheet, combined with the heroic efforts of my friends Rushika and Beth and my aunt Susan meant that everything came together beautifully, with only one totally hysterical meltdown.
Part One: The Cake
I probably shouldn't have been too fussy, given that the last cake I baked for Sarah was this gem, and she still asked me to bake the wedding cake:
Still, I wanted to avoid an outcome like my favourite Cake Wrecks post:
http://www.cakewrecks.com/home/2008/7/10/inspiration-vs-perspiration.html
And I decided the first week in August to bake a practice cake. Erm. I call it the caketastrophy.
I learned a lot from this cake. I learned I wouldn't be using that recipe for the wedding (or any recipe that involved folding in whipped egg whites). I learned that I hadn't really ever made a layer cake and maybe it was a big mistake to think I should. I learned that cake layers don't stack nicely when they aren't flat - and the more layers you pile on, the more you build the leaning tower of cake. I (re)learned that your cake really has to be totally cool, not just lukewarm, before trying to ice it. And I learned that using blue fondant to cover a cake because it's what you have lying around isn't really a good idea.
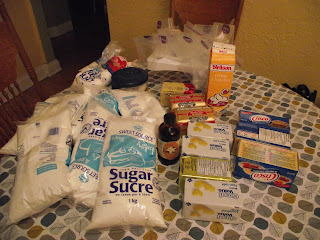
For practice cake 2, I bought insulated cake strips - you douse them in water and wrap them around your cake pan to prevent doming, and help create nice flat layers. Something something science something something. I can report that it really does help. I also tried out only making 2 layers, but still using 4 colours (by dividing the batter into 4 and in two cake pans, spreading one colour around the bottom, and dropping a second colour on top and allowing them to bake together. I made the Butter Cake recipe from the Miette cookbook, and this recipe is AMAZING. It involves 10 egg yolks, and beating the butter and sugar for 12 minutes. This cake turned out nicely, but it seemed a little small for wedding cake. And I didn't bother with fondant, just buttercream. This would be a fatal error in judgement that would come back to bite me on night before the wedding.
Just to be safe, I decided to make one more practice cake the week before the wedding to try doubling the recipe to make a taller cake, and try out the fondant again. I had four matching cake-pans, but thought I would bake the top layer in a nicer, rounded one so that the top of the cake would have a nice rounded edge. I learned this was a major miscalculation, and the different cake pan produced a layer that was basically unusable with the rest of the cake.
I also learned that the fondant was a bit of a pain. I tried to roll it out onto the impression mat directly, but it just stuck to the mat and then fell apart. I watched the Wilton informerical for the mat, which basically said this thing was so easy a child could use it with impressive results, and I had renewed confidence that if I just followed the instructions, all would be okay with the fondant for the real cake. NOT THE CASE.
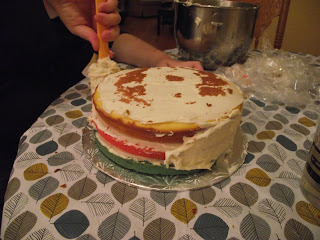
Everything with the cake was going really well:
I iced the layers, and they stacked nicely. Then I rolled out the fondant. Pretty:
That is fondant from Flour Confections in Pickering - it tastes like Oreo filling instead of plastic like a lot of other fondant does, it's easy to work with, and Rushika sweetly picked it up for me. And it was rolled out on my aunt's fondant mat, which is much nicer to work with than pretty much anything else. But for whatever reason, when Rushika and I tried to put the fondant onto the cake, it fell to pieces. AND SO DID I. It was the ugly cry, people. And sadly, for you, there are no photos of me or the cake from the next half hour, but neither were very pretty. We tried rerolling, and it didn't work. We tried cutting out a circle to cover the top, which I did, but it looked ridiculous. I was in the middle of sobbing, trying to send Rushika home, and annoucing I was going to buy a cake at Dairy Queen, when my aunt and uncle showed up to drop off a cooler and the cupcakes I had been storing with them. My aunt worked some magic, I got out of the way, and the cake was saved. It was too tall for my cake carrier, but it survived the trip to the wedding in a 3 tier cupcake carrier with the cupcake inserts removed. Dylan's mom helped me move the cake onto the pedestal, and maybe it was sheer exhaustion but I was actually pretty happy with it. Really, by that point, I was just happy it was in one piece:
Part Two: The Cake Topper
I didn't know a lot about cake toppers before making this wedding cake, and what I learned about them was that they are either ugly, expensive, or both. So, I decided to go with something simple and sweet. Sarah's family is Dutch, and it is a Christmas tradition to give loved ones a chocolate letter of their first initial at Christmas time. When I was living with them her mom sent us all chocolate letters. It is a little difficult to find chocolate letters at this time of year, but I tracked down a retired couple in Pennsylvania who sold them online. I ordered two of each letter so that I would have a back-up. The letters survived the mail no problem, and I melted down some dark chocolate to attach poles so that we could mount the letters onto the cake.
I crossed this off my to-do list and moved on. But the night of the rehearsal dinner I was showing Sarah's sisters the letters - I was really happy with how they had turned out and wanted to show them to her because of the advice she had given me while I was looking for them. Then I promptly dropped the bag with the originals and the back-up letters. And everything shattered. THIS IS WHY THE PRESIDENT AND THE VICE-PRESIDENT SHOULD NEVER BE IN THE SAME LOCATION. I tried to regroup and strategize, texting my friend Beth who was driving up that night to help me, to ask where we could go to buy some dark chocolate to melt down to try and glue together the broken letters. Beth blew my mind by finding replacement letters within about 30 minutes of the first emergency text message. The morning of the wedding Beth and I sat in the parking lot of Bulk Barn, waiting for it to open to buy lollipop sticks and chocolate to melt down to attach those sticks to the new letters. By 10 am, the new cake-topper had been constructed and was totally beautiful.
Part Three: Cupcakes
I don't like doubling recipes, so I knew that if I was going to make 150 cupcakes, I may as well make several different kinds. I settled on Red Velvet, Devil's Food, Lemon, Brown Sugar, and Vanilla. As you may know, I have the world's smallest kitchen, so I took my aunt up on her offer to bake the cupcakes at her place, which was also convenient to the church freezer I was able to store them in. I had been resistant to freezing the cupcakes, but after the caketastrophy incident, I knew that there was no way I would have enough time to be baking the cupcakes "live" in the days before the wedding.
I also knew that I wanted the cupcakes to follow the same rainbow colour theme, so I ordered greaseproof cupcake liners from Flour Confections so they would keep their colour and colour sugar pearls from the Vanilla Food Company. The plan was for each cupcake to have a colourful liner, then white swirled icing topped with sugar pearls of the same colour, and a matching "cupcake pick." I made the little cupcake toppers by punching out paper with a 1" scalloped paper punch, then printing out stickers that had Sarah & Dylan's names and wedding date or the name of the cupcakes, and then Rushika glued the papers to toothpicks:
For the icing, I was looking for one that would hold up better in the heat, and my googling lead me to this awesome recipe, which even came with a helpful video:
http://www.youtube.com/watch?v=tLcCbN2I4xI
I emailed the creator of the video, who very graciously emailed me back to assure me that I could make and then refridgerate the icing a few days ahead of time. So, Rushika and I made 7 batches, and then filled 10 icing bags with it. To save time the day of the wedding, I bought 10 matching icing tips, so that the messy job of refilling icing bags would have been kept to a minimum. [Though the mess would have been greatly reduced by Rushika's idea of putting all the icing in a large ziploc bag, cutting off a tip, and squeezing the icing into the bags that way.]
Two days before the wedding, my aunt and uncle took the cupcakes out of the freezer and brought them by my place where I put them in the cupcake carriers to thaw. Before this wedding I already had 3 cupcake carriers, but I realized I would need to seriously increase my capacity to move cupcakes, and found some compact, stackable carriers for a reasonable price online - the only glitch there was that Rushika had to drive me an hour out of town to the "local" FedEx pick-up location. But they were definitely worth it, as they did their job, not only transporting the cupcakes from my house to the wedding site, but also doubling as little trays to move the cupcakes from the icing location to the dessert table.
The day of the wedding my friend Beth came with me and while I iced, she added sugar pearls and cupcake picks. I had bought special decorating tongs to make the addition of sugar pearls easier, but we were adding so many sugar pearls that we didn't really need them - still they will be good for future projects where some precision is needed. It took about two hours to assemble all the cupcakes, but they looked great:
Part Four: Sugar Cookies
Ever since I got my loadable text cookie cutters last year, I have been obsessed with making cookies with messages, so I thought it would be perfect to make some cookies with the wedding date on them for the dessert table. Unfortunately the set I owned didn't include numbers. But! I found a similar set from Germany and ordered it from ebay and it worked out perfectly!
Part Five: Cookie Dough Truffles
These truffles don't need much explanation. I have made them 4 or 5 times since finding their recipe on Love & Olive Oil and every time they disappear. They are wondrous and several of the guests were asking about the recipe.
Part Six: Candy Buffet
I bought some glass bowls at the dollar store to fill up with rainbow candies and licorice, but then was trying to figure out what to give guests to put their candies in. I asked a friend who had a candy buffet at her wedding a few years ago what she had done, and she mentioned they used paper bags and put a stamp on them. I looked almost everywhere for small paper bags, and was coming up empty. My aunt drove me out to the middle of a suburban jungle, and still no luck. But! My aunt had the genius idea of using small paper cups, which were PERFECT. [I eventually did find small paper bags by accident, but I think I like the cups even better]. I put stickers on the front with Sarah and Dylan's names & wedding date, and rubber stamped two birds and a heart onto the other side of the cups
Part Seven: The Table Banner
I made a small banner to hang off the dessert table, with photos of Sarah and Dylan together (some of mine and some from the other bridesmaids and other friends) interspersed with coloured flags, stamped with their name & wedding date, all clipped on with tiny coloured clothespins:
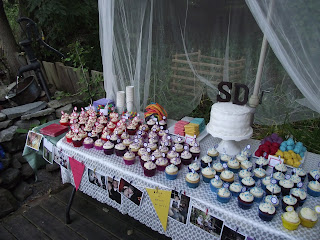
The Final Effect
And now I sleep.


